

 摘要:
本文来源:http://mawenjian.net/p/1281.html以下为下文...
摘要:
本文来源:http://mawenjian.net/p/1281.html以下为下文... 以下为下文
一、服务器端配置
1.操作系统及软件要求
1)操作系统要求
根据官网介绍,虽然SoftEther VPN Server只要Linux内核版本在2.4及以上就可以运行,但是官方推荐使用如下三个Linux发行版:
Red Hat Enterprise Linux
Fedora
CentOS
2)软件和库的要求
在安装之前,需要安装以下软件和库(其实不用人工检查,安装前检查在检测到缺少依赖时会提示的):
gcc software
binutils software
tar, gzip or other software for extracting package files
chkconfig system utility
cat, cp or other basic file operation utility
EUC-JP, UTF-8 or other code page table for use in a Japanese language environment
libc (glibc) library
zlib library
openssl library
readline library
ncurses library
pthread library
2.下载SoftEther VPN Server
(以CPU是 Intel x86/Intel x64/AMD64为例,其他型号请到官网下载对应的版本,https://www.softether-download.com/cn.aspx?product=softether)服务器在国外的用户建议直接从官网下载。
Intel x86(32位):
wget https://www.softether-download.com/files/softether/v4.10-9473-beta-2014.07.12-tree/Linux/SoftEther_VPN_Server/32bit_-_Intel_x86/softether-vpnserver-v4.10-9473-beta-2014.07.12-linux-x86-32bit.tar.gz
Intel x64/AMD64(64位):
wget https://www.softether-download.com/files/softether/v4.10-9473-beta-2014.07.12-tree/Linux/SoftEther_VPN_Server/64bit_-_Intel_x64_or_AMD64/softether-vpnserver-v4.10-9473-beta-2014.07.12-linux-x64-64bit.tar.gz
国内用户因为需要爬梯子,所以可以使用我提供的镜像文件:
Intel x86(32位):
wget https://files.mawenjian.net/SoftEtherVPN/softether-vpnserver-v4.10-9473-beta-2014.07.12-linux-x86-32bit.tar.gz
Intel x64/AMD64(64位):
wget https://files.mawenjian.net/SoftEtherVPN/softether-vpnserver-v4.10-9473-beta-2014.07.12-linux-x64-64bit.tar.gz
3.解压文件
tar -zxvf softether-vpnserver-v4.10-9473-beta-2014.07.12-linux-x86-32bit.tar.gz
(64位对应的是:“tar -zxvf softether-vpnserver-v4.10-9473-beta-2014.07.12-linux-x64-64bit.tar.gz”)
4.安装程序(其实是运行环境检查)
此时会在当前目录解压出一个vpnserver目录,接下来运行安装脚本:
cd vpnserver
./.install.sh
接下来按照提示,输入3个“1”即可。如果满足运行条件,会提“The command completed successfully.”;反之,若不满足条件,则会提示相应的错误(一般是依赖的库没有安装完全)。
我在给第二台机器安装的时候遇到SoftEner VPN Server提示“/usr/bin/ld: crt1.o: No such file: No such file or directory”错误。经查,是因为我的操作系统是64位,而安装的SoftEther VPN Server是32位的缘故,换成64位的安装程序即恢复正常。
5.启动程序
执行以下命令启动Softether VPN Server服务:
./vpnserver start
如果要停止,执行:
./vpnserver stop
到这里,服务端就算配置完成了。怎么样,够简单吧?
二、使用本地管理工具配置服务器端
1.下载“SoftEther VPN Server管理器”:https://pan.baidu.com/s/1mghwPyK;
2.运行“vpnsmgr”,选择“新设置”,在新面板中填写“设置名”和“主机名”,保存配置信息;
3.连接到你刚才配置的服务器,首次登陆会提示你设置一个管理员密码:

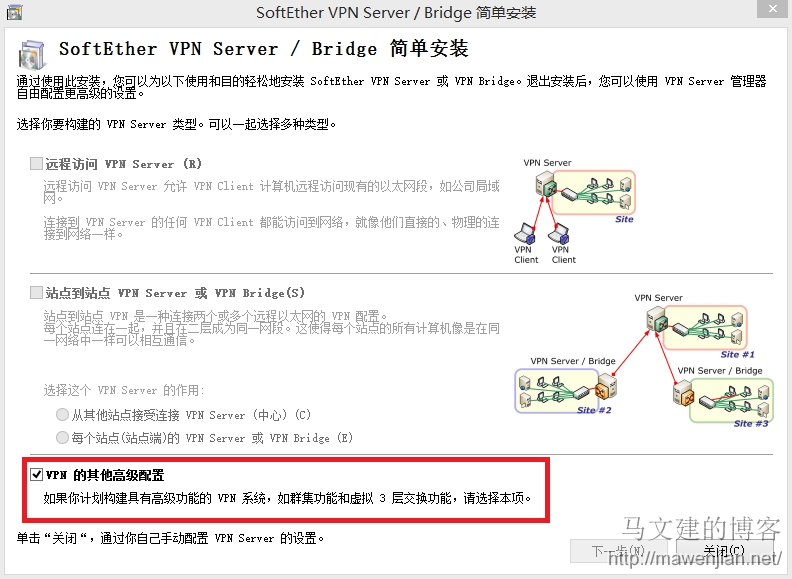
4.然后在弹出的”SoftEther VPN Server/Bridge 简单安装“面板中,选择”VPN的其他高级配置“(因为我们需要在服务器端做NAT转换),关闭;
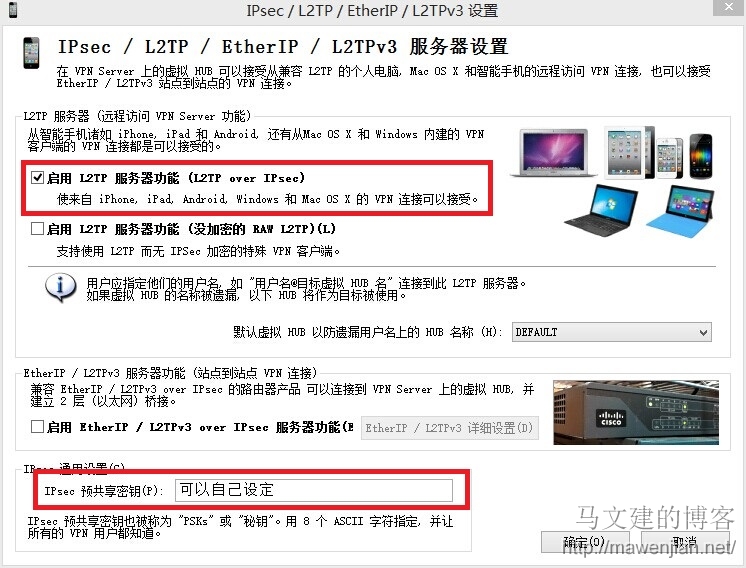
5.此时会提示”此VPN Server已具有支持兼容IPSec/L2TP/EtherIP/L2TPv3协议的VPN Client或VPN路由器的新功能。……您要设置IPSec吗?“,选择”是“。在新面板中,一般只启用L2TP服务器功能(L2TP over IPsec)就足够了,更改”IPsec预共享密钥“,确定。
6.添加认证用户:
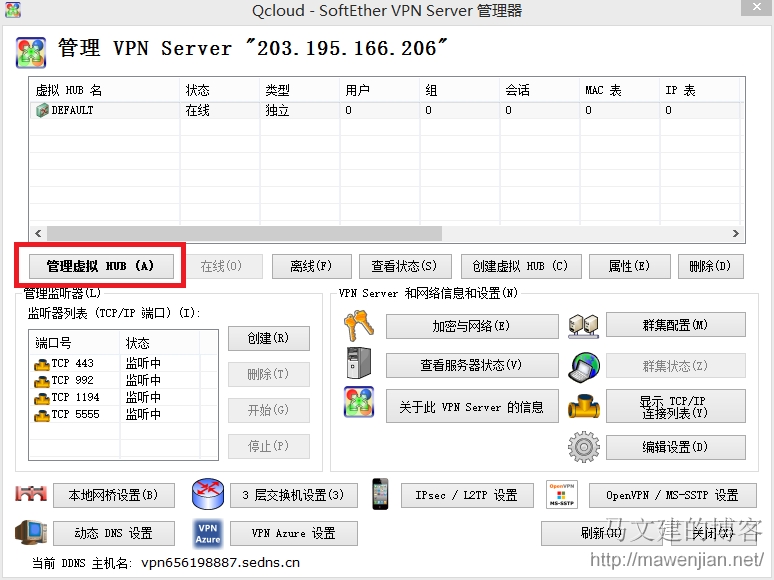


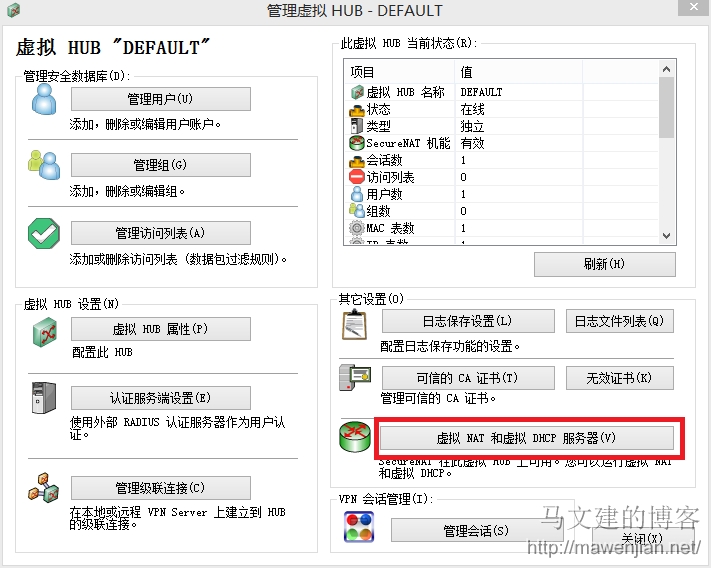
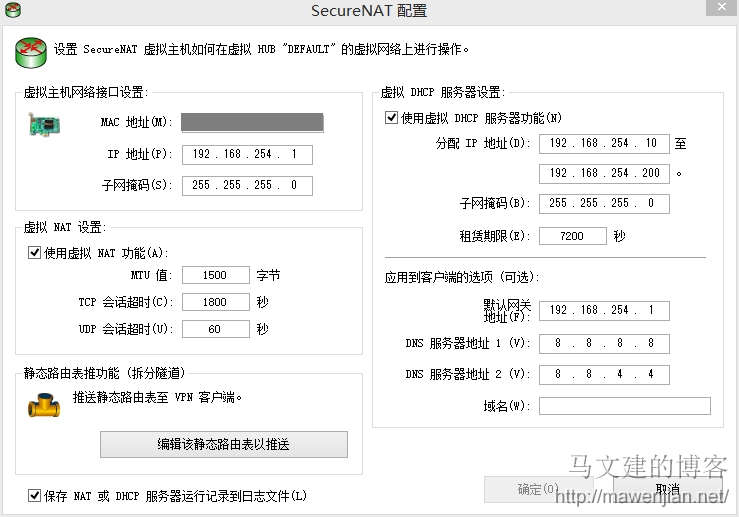
7.开启NAT转换和DHCP服务
选择“虚拟NAT和虚拟DHCP服务器”,然后选择“启用SecureDHCP”;再选择“SecureDHCP配置”。如果你不会配的话,可以按照我的配置来。
注意:不要同时开启SecureNAT和Bridge ,否则会造成package loop,进而导致100% cpu usage。(感谢苍崎深雪同学的热心提醒)
三、连接到服务器
根据刚才的配置,有两种连接方式(或者说我只测试了两种):第一种是下载SoftEther VPN Client,使用SSL-VPN协议连接;第二种是使用Windows/Linux/Android等自带的VPN连接(使用L2TP协议)。使用L2TP协议时应当注意:1)”VPN类型“需要选择”L2TP/IPsec“;2)需要到”高级设置“中输入先前设置的预共享密钥。细节就不再讲了,其他操作系统类似。